

There are four (4) sections in this installation guide:
- Files Installation
- SharePoint Database Configuration
- Choose SharePoint Ticket Lists
- Choose SharePoint KB List
1) Files Installation
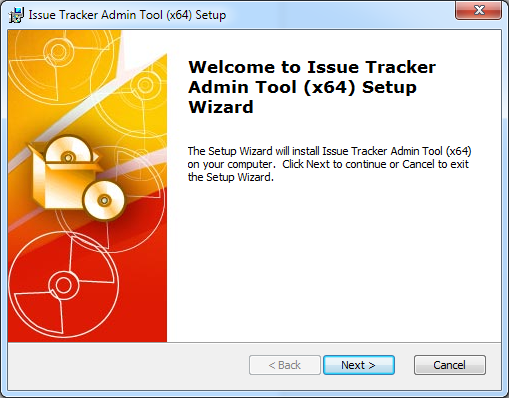
Step 1. Run the IssueTrackerPersonalSetup_xXX.exe to start the installation. Click ‘Next‘ to Continue. If Outlook 2010 or later is not installed, the setup wizard will not be able to proceed. Please also ensure Outlook is shutdown (if already running or active in the task manager) as the setup has to install an Outlook add-in.
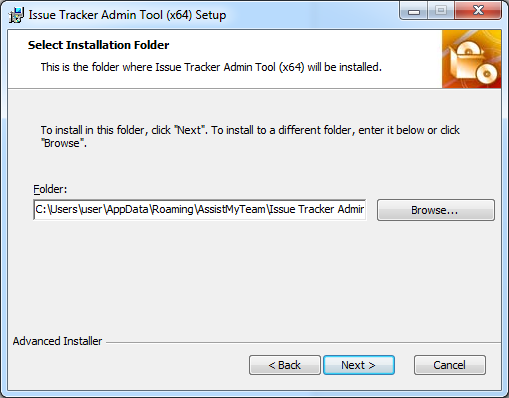
Step 2. Select the appropriate destination folder where the application files will be installed. If you change the default folder path, please make sure you have appropriate permission. (Note: by default, it will be installed under your application data folder)
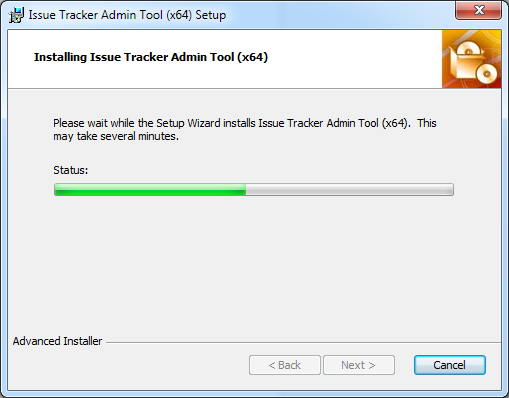
Step 3. Click ‘Next’ to continue with the files extraction. It just takes a few minutes to complete the whole copying process.
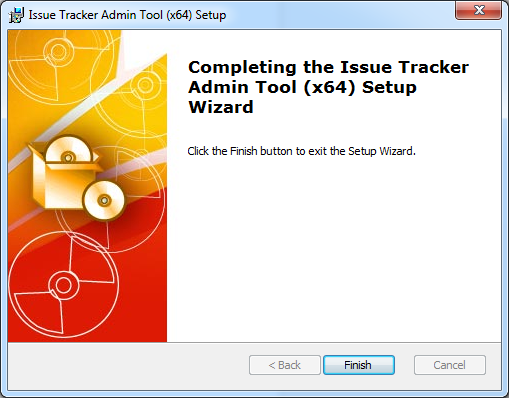
Step 4. Click ‘Finish’. This ends the files installation process in your system.
2) SharePoint Connection & Configuration
The next step is to choose a SharePoint site, under which, a new list titled ‘TeamIssueTrackerSettings‘ would be created, to store the metadata and mapping settings as performed by the administrator.
Why store the helpdesk settings in a special SharePoint list?
Because you might be working remotely and might not have access to the company’s local network remotely, using a network database or shared folder won’t be feasible. Instead, in Issue Tracker system, the helpdesk configuration and settings data are stored in a special SharePoint list (having the name ‘TeamIssueTrackerSettings‘) which is accessible to all helpdesk staffs, on the local network, WAN or via the WWW.
In short, this list will act as a Helpdesk Settings data source, and your Issue Tracker add-in would connect to it.
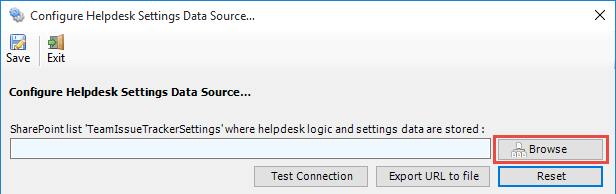
Start Outlook and you would be automatically prompted with the ‘Helpdesk Settings Data Source…’ panel. If it is not visible, you can invoke it from Outlook > Issue Tracker toolbar > Team Settings menu > Configure Helpdesk Settings Data Source…

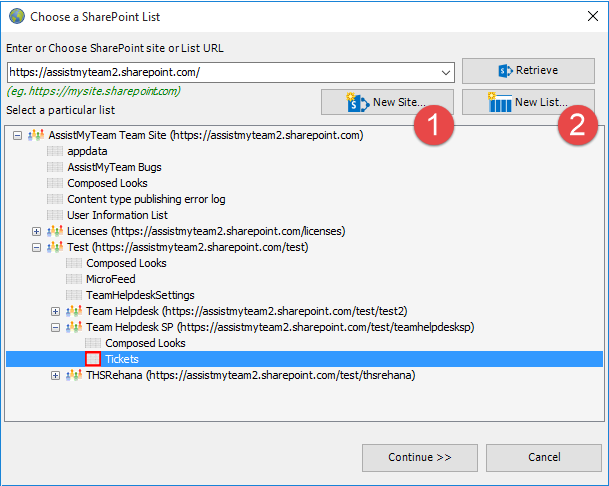
To specify a SharePoint site, click the ‘Browse…’ button.
This would allow you to enter the URL of the SharePoint. When entering the URL, always use the parent site URL in the format http://mySharePointsite. And click ‘Retrieve’ to show all available sub-sites and lists.
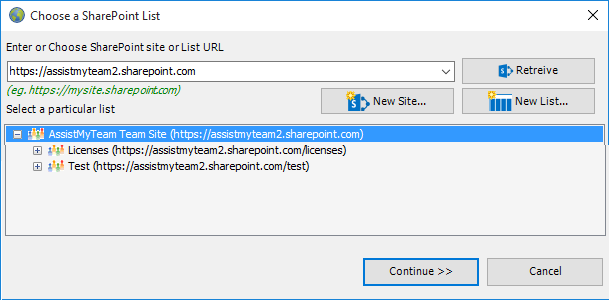
Select the particular site to which the Settings list would be created, and then click ‘Confirm’.
Very Important! Your permission to the SharePoint site: Make sure that you have ‘Full Control’ permission over the SharePoint site so that Issue Tracker add-in can create the ‘TeamIssueTrackerSettings’ list automatically.
And then select the particular site under which the Helpdesk settings would be stored. You can also choose to create a new sub-site on the fly by clicking the ‘New Site…’ button and select it. When you click ‘Confirm’, Issue Tracker Add-in will automatically create and configure a new SharePoint list titled ‘TeamIssueTrackerSettings’ under the site. And then any settings/drop down lists you defined from Issue Tracker add-in in Outlook would be saved in this repository.
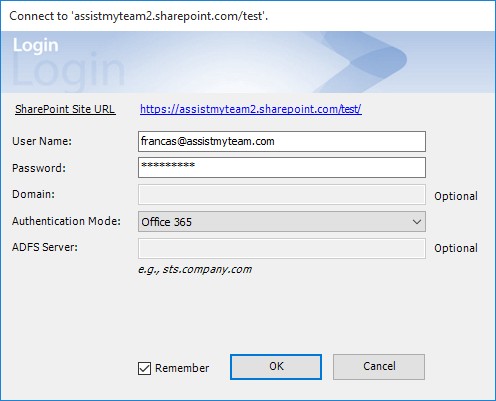
If the SharePoint site uses the NTLM or windows authentication, the add-in will use the default credential to connect to the SharePoint. However, for form-based or claimed-based authentication (for example, Office 365 SharePoint online), it may prompts you (and other individual technician) to enter their credential.
In the username, exclude any domain information. For instance, do not enter in the format DOMAIN\UserName. Only enter UserName. Check ‘Remember’ so that Issue Tracker add-in can use the same credential to logon to the SharePoint site in subsequent connection. You can also specify the authentication mode that is used by your SharePoint to allow connection to it. For instance, if your SharePoint is configured for Windows authentication, choose ‘NTLM’. If it used a form-based authentication, then choose ‘Forms’ whereas if it used a claimed-based authentication (for Office 365 SharePoint Online), choose ‘Office 365’.
NOTE: Recent changes in Office 365 SharePoint policy mandates that third party apps use OAuth 2.0 modern authentication method. Therefore, the Issue Tracker App will not ask for your password, instead it will request an access token from your Microsoft 365 server via your web browser.
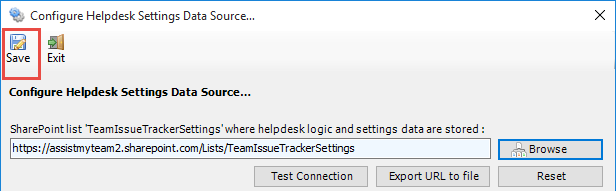
Once you click ‘Save’, this helpdesk settings list will be automatically created in the chosen SharePoint site, when the manager configures the admin tool the first time. And then any settings/drop down lists you defined from Issue Tracker add-in in Outlook would be saved in this repository.
What SharePoint permissions are required?
You should have at least ‘Contribute’ permission the SharePoint list ‘TeamIssueTrackerSettings’ as well as to all other SharePoint lists that are chosen as the ticket repositories.
You can use any SharePoint versions – on-premises or hosted like Office 365 SharePoint Online.
3) Choose SharePoint Ticket Lists
Before you can start raising trouble tickets from Outlook emails to SharePoint, you need to choose the destination SharePoint lists, to which the captured ticket metadata from Outlook will be stored as a list item.
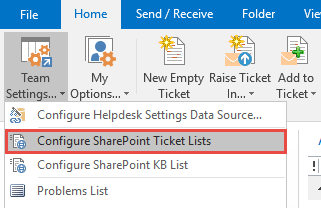
To configure a new SharePoint list and map fields with the Outlook mails, go to Team Settings menu > ‘Configure SharePoint Ticket Lists’.
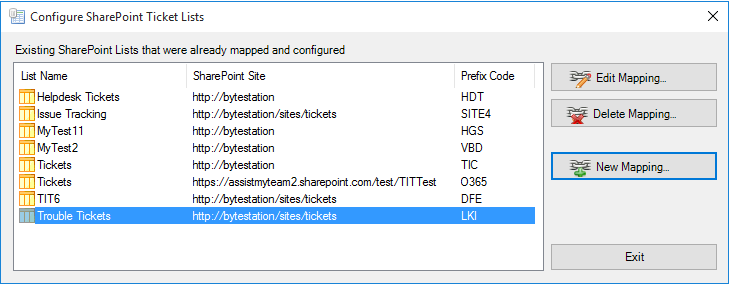
Here is a listing of all SharePoint lists that are configured for storing trouble tickets. These chosen SharePoint lists would be deployed to your Outlook (i.e., you would be able to raise a ticket from an email to one of these SharePoint list).
To configure a new SharePoint ticket list and perform fields mapping, select ‘Add New Issue Tracking SharePoint List’ option and click ‘Mapping…’ button. You will then be prompted to enter the SharePoint site URL, and it would allow you to choose a SharePoint list.

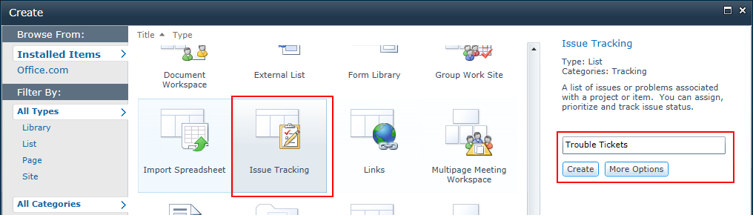
You can choose existing SharePoint lists or create new one for this purpose. Ideally, we recommend that the SharePoint lists you will choose (to be used with Issue Tracker add-in) were created/derived from the inbuilt ‘Issue Tracking’ template in your SharePoint. This is because such SharePoint list already comes with predefined helpdesk fields and views which can be directly ported with Issue Tracker add-in’s functionality.
For instance, you can create a new list (e.g., Trouble Tickets) based on the ‘Issue Tracking’ template below:
And then choose this newly created SharePoint list (e.g. Trouble Tickets) or any other existing lists from the mapping tool and click ‘Confirm’.
Instead of creating the new site/list in the SharePoint using your web browser, you can also choose to create – new site or list directly from the add-in.
![]() New Site – Create a new site directly under the chosen parent site to be used exclusively for Issue Tracker add-in. By default, the site will be created as a blank site, unless a different site template is specified.
New Site – Create a new site directly under the chosen parent site to be used exclusively for Issue Tracker add-in. By default, the site will be created as a blank site, unless a different site template is specified.

![]() New List – You can choose to create a new list directly under the chosen site. By default, the list would be created using the ‘Issue Tracking’ template available in your SharePoint. However, you can change the template from the drop down.
New List – You can choose to create a new list directly under the chosen site. By default, the list would be created using the ‘Issue Tracking’ template available in your SharePoint. However, you can change the template from the drop down.

After choosing a destination SharePoint list (either by creating a new one, or by selecting an existing list), you can proceed to start mapping the fields between Outlook and SharePoint.
Through the mapping tool, you can choose which fields from the emails in Outlook are to be extracted and published to the SharePoint ticket list, and perform the mapping between these chosen fields of the emails to that of the SharePoint ticket list.
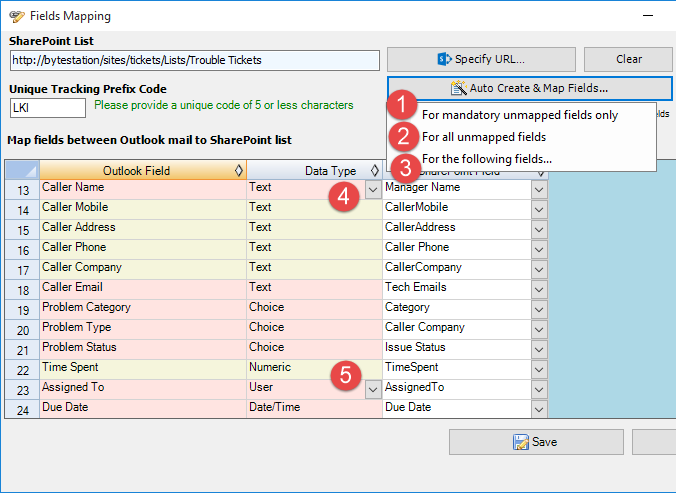
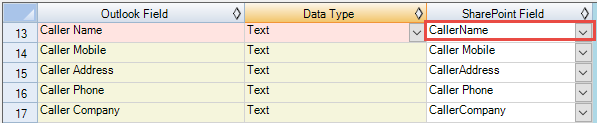
A mapping is nothing but an association between an Outlook field (e.g., subject of the mail item) to a specific SharePoint list field (e.g., Title). You have complete control over which data goes to the SharePoint list from Outlook. In the mapping dialog box (above), the first column lists all the email fields as available in Outlook. The second column displays the data type of the field. In the last column, there is a drop down list on each row, consisting of all available SharePoint fields. Just simply choose a SharePoint field from the drop down box to map it to the corresponding Outlook field. For example, in the screenshot above, Outlook field ‘Problem Category’ is mapped to SharePoint field ‘Category’.
You can choose to auto create the required fields in the SharePoint list as well as auto-map the fields between the helpdesk and SharePoint.
![]() For mandatory unmapped fields – Click this option under the ‘Auto Create & Map fields’ menu to create the mandatory helpdesk fields in the chosen SharePoint list on the fly and automatically complete the mapping. Mandatory fields are marked/colored in light red. The following fields are mandatory to complete the mapping – Subject, Issue Conversation, Caller Name, Caller Email, Assigned To, Problem Category, Problem Type, Problem Status, Due Date, Resolved, Resolved Date.
For mandatory unmapped fields – Click this option under the ‘Auto Create & Map fields’ menu to create the mandatory helpdesk fields in the chosen SharePoint list on the fly and automatically complete the mapping. Mandatory fields are marked/colored in light red. The following fields are mandatory to complete the mapping – Subject, Issue Conversation, Caller Name, Caller Email, Assigned To, Problem Category, Problem Type, Problem Status, Due Date, Resolved, Resolved Date.
![]() For all unmapped fields – Click this option under the ‘Auto Create & Map fields’ menu to create all the helpdesk fields that have not been mapped yet in the chosen SharePoint list and complete the mapping automatically. If the chosen SharePoint list have any matching existing fields, instead of creating new ones, the add-in will try to use them to map with the helpdesk fields. For instance, if the chosen SharePoint list was created based on the ‘Issue Tracking’, the list already contains predefined fields such as Title, Due Date, Description, Assigned To, Issue Status etc.
For all unmapped fields – Click this option under the ‘Auto Create & Map fields’ menu to create all the helpdesk fields that have not been mapped yet in the chosen SharePoint list and complete the mapping automatically. If the chosen SharePoint list have any matching existing fields, instead of creating new ones, the add-in will try to use them to map with the helpdesk fields. For instance, if the chosen SharePoint list was created based on the ‘Issue Tracking’, the list already contains predefined fields such as Title, Due Date, Description, Assigned To, Issue Status etc.
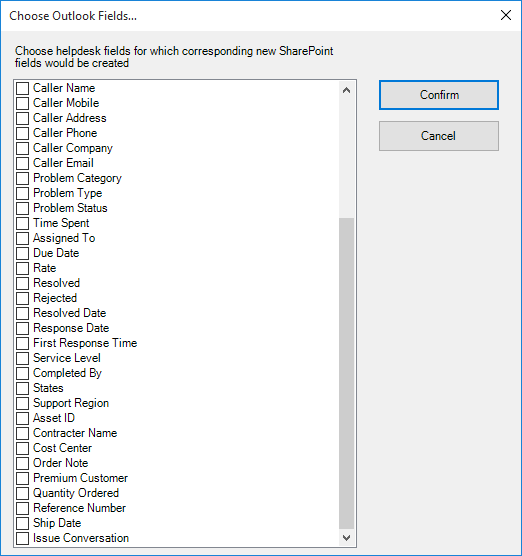
![]() For the following fields – Click this option under the ‘Auto-Create & Map fields’ menu to choose specific helpdesk fields of interest that will be auto-created in the chosen SharePoint and mapped automatically.
For the following fields – Click this option under the ‘Auto-Create & Map fields’ menu to choose specific helpdesk fields of interest that will be auto-created in the chosen SharePoint and mapped automatically.
![]() For ‘Caller Name’ field, you can further specify which SharePoint data type will be used to store the caller information contained in the case in Outlook. For instance, you can choose if the SharePoint caller name field will store the info as a SharePoint user/group type (assuming the caller exists as a user in SharePoint), or as a plain text. By default, the ‘Caller Name’ field is set to be used and mapped to a SharePoint text field.
For ‘Caller Name’ field, you can further specify which SharePoint data type will be used to store the caller information contained in the case in Outlook. For instance, you can choose if the SharePoint caller name field will store the info as a SharePoint user/group type (assuming the caller exists as a user in SharePoint), or as a plain text. By default, the ‘Caller Name’ field is set to be used and mapped to a SharePoint text field.

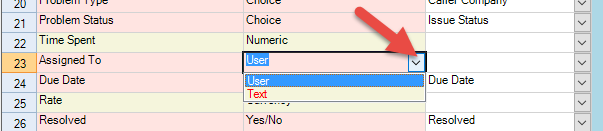
![]() For ‘Assigned To’ field, you can also specify which SharePoint data type will be used to store the technician information contained in the case in Outlook. For instance, you can choose if the SharePoint Technician field will store the info as a SharePoint user/group type (assuming the technician exists as a user in SharePoint), or as a plain text. By default, the ‘Assigned To’ field is set to be used and mapped to a SharePoint User/Group field.
For ‘Assigned To’ field, you can also specify which SharePoint data type will be used to store the technician information contained in the case in Outlook. For instance, you can choose if the SharePoint Technician field will store the info as a SharePoint user/group type (assuming the technician exists as a user in SharePoint), or as a plain text. By default, the ‘Assigned To’ field is set to be used and mapped to a SharePoint User/Group field.
Optionally, to have finer control, you can also manually create new fields in the chosen destination SharePoint list and map with the helpdesk outlook fields.
Create New SharePoint Field – on the fly
In the drop down list of the SharePoint field, you will also notice that there is an item ‘[NEW LIST FIELD]’. You can select this item to create a new field in the particular SharePoint list, directly from this mapping tool, so that you can map the specific Outlook field to this new SharePoint field, without requiring you to create it in your SharePoint site.
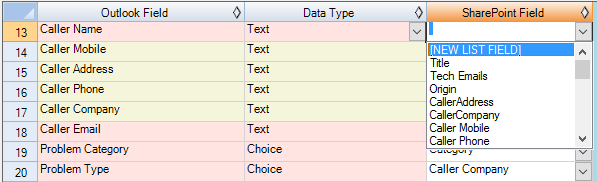
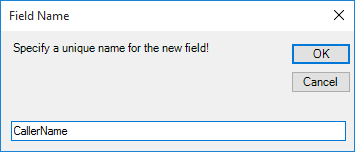
Specify a field name that you would like to appear in the SharePoint list. Only input valid characters and avoid using special characters such as symbols.
The new SharePoint field will have the same data type as that of the corresponding Outlook field.
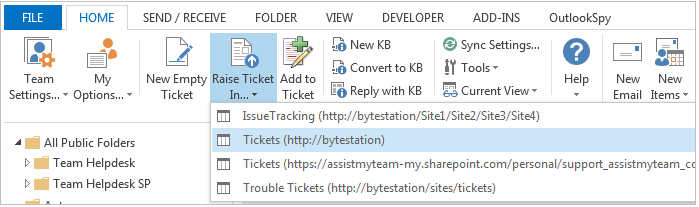
If you have added multiple SharePoint ticket lists in Issue Tracker add-in, you will notice that the ‘Raise Ticket in‘ drop down menu shows all of them. You and other technicians can then simply choose the destination SharePoint list to which a new ticket will be raised from the selected email in Outlook.
So, through the Issue Tracker administrator console, you can define, map and link any number of SharePoint lists from multiple sites so that, you can have a choice to choose a particular SharePoint list of interest to which new tickets from your emails can be raised from your Outlook.
4) Choose SharePoint KB List
Before you can start creating and using KB articles, the knowledge base module needs to be first configured and mapped with a SharePoint list. For KB mapping, you can use a simple custom SharePoint list as it does not require that many fields.
For instance, you can use the ‘Custom List’ template to create a new SharePoint list ‘KB’ to store the KB articles and link up with Issue Tracker add-in.

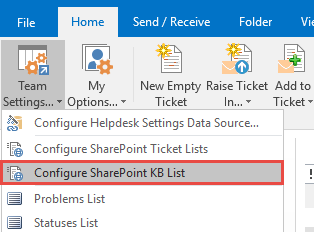
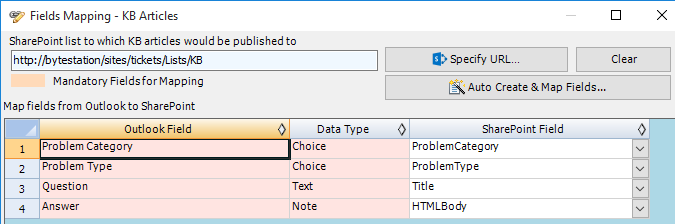
To configure a new SharePoint list for use for storing KB articles, go to Team Settings menu > ‘Configure KB SharePoint List’.
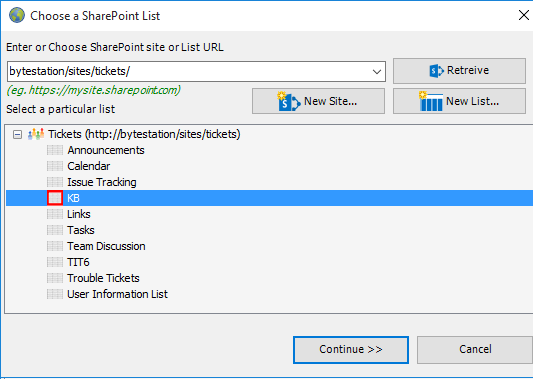
You will be prompted to enter the SharePoint site URL, and it would allow you to choose an existing SharePoint list to be used as the KB repository. If you want to use a new list, click ‘New List…’ button to create one directly. You can also choose to create a new sub-site and list directly from the dialog box by clicking the ‘New Site…’
Now all that is left is to complete the mapping between the KB fields and the fields from the chosen SharePoint list.
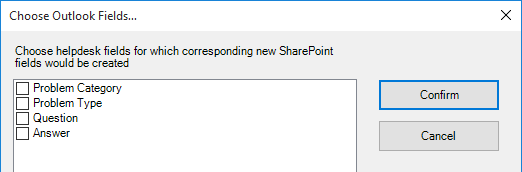
There are essentially four (4) fields in KB to SharePoint mapping – Problem Category, Problem Type, Question, Answer.
If the chosen SharePoint list does not have existing fields, this mapping feature will allow you to dynamically create new field of the relevant data type in the SharePoint list.
![]() For all unmapped fields – Click this option under the ‘Auto Create & Map fields’ menu to create all the KB fields that have not been mapped yet in the chosen SharePoint list and complete the mapping automatically. If the chosen SharePoint list have any matching existing fields, instead of creating new ones, the add-in will try to use them to map with the KB fields.
For all unmapped fields – Click this option under the ‘Auto Create & Map fields’ menu to create all the KB fields that have not been mapped yet in the chosen SharePoint list and complete the mapping automatically. If the chosen SharePoint list have any matching existing fields, instead of creating new ones, the add-in will try to use them to map with the KB fields.
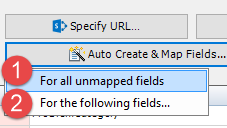
![]() For the following fields – Click this option under the ‘Auto-Create & Map fields’ menu to choose specific KB fields of interest that will be auto-created in the chosen SharePoint and mapped automatically.
For the following fields – Click this option under the ‘Auto-Create & Map fields’ menu to choose specific KB fields of interest that will be auto-created in the chosen SharePoint and mapped automatically.
Optionally, to have finer control, you can also manually create new fields in the chosen destination SharePoint list and map with the KB fields. Simple select the ‘NEW LIST FIELD’ from the corresponding field drop down in the ‘SharePoint Field’ column.

At any point of time, you can come back to this mapping tool, to edit or map to a different SharePoint field or list. Now, you are ready to document new KB articles and use this collective knowledge base for solving repetitive support queries from your end users.
NOTE: There are other administrative configurations that you would need to undertake. These options are available in the ‘Team Settings…’ drop down menu of the Issue Tracker toolbar or ribbon in Outlook.
For more references and helps on performing these administrative configurations, refer to the PDF Help Manual, which can be invoke from the Outlook > Issue Tracker toolbar or ribbon > Help > Help Topics.
PDF version of this installation guide is available for download here.