Install Steps
Guide to install quickly, up and running for use in just a minute or two
Home > Windows Apps > PDF Converter for Windows > Installation Guide
With this guide, you would be able to quickly install and easily configure AssistMyTeam PDF Converter for Windows in your system, and effortlessly generate PDF documents from files and folders.
PDFConverterSetup.zip (for both 64-bit and 32-bit Windows)
The downloaded zip file contains the setup.exe and other supporting documents. Extract these file contents to a file folder.

Warning!
PDF Converter requires ‘Per Machine Installation’, that is, the application will be installed to serve all users of the system (e.g., the files will be installed under Program files folder (similar to Citrix/Terminal Server). Therefore, only those users with administrative rights on the system should perform the installation.
NOTE: A PDF version of this installation guide is available for download here.
Step-by-Step Guide
Step 1. Run the PDFConverterSetup.exe to start the installation. Click ‘Next’ to Continue.

Step 2. Select the appropriate destination folder where the application files will be installed. If you change the default folder path, please make sure you have appropriate permission. (Note: by default, it will be installed under your Program Files folder)

Step 3. Click ‘Next’ to continue with the files extraction. It just takes a few minutes to complete the whole copying process

Step 4. Click ‘Finish’. This ends the files installation process in your system.

Now go to Start Menu > All Apps. If the installation was successful, you will see new menu entry ‘AssistMyTeam PDF Converter’.

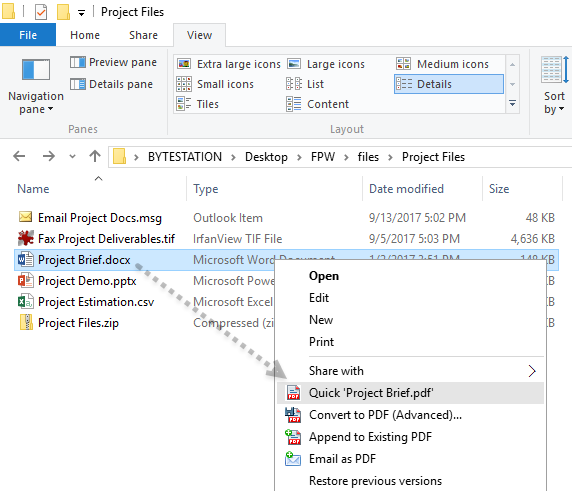
Go to your Windows Explorer. And right-click any files or folders. You should be able to see the four (4) PDF menu options that PDF Converter app has added in the context menu. You can quickly output a PDF file of the selected file in the same folder in single click, or use more advanced PDF options with the second option.

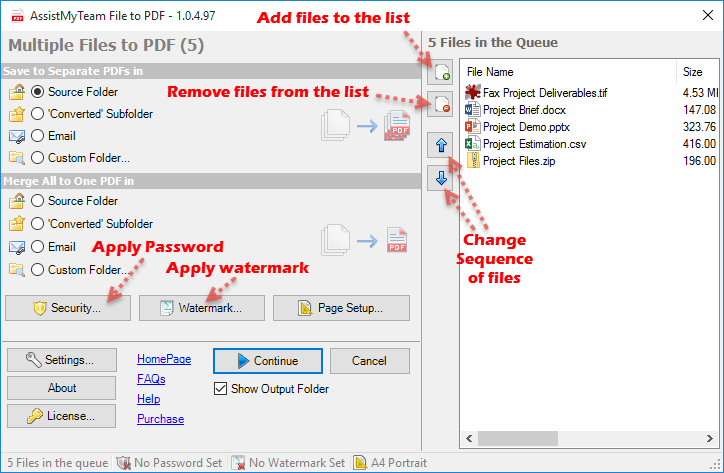
You can also launch the PDF Converter Advanced Mode to process and convert files and folders to PDF. With this, you can customize the advanced options and have finer control over the PDF Output. You can add files and folders to the queue, choose if to generate individual PDF files or one single PDF file, apply watermark, password and other security options as well as choose the location to which the PDF files will be generated.

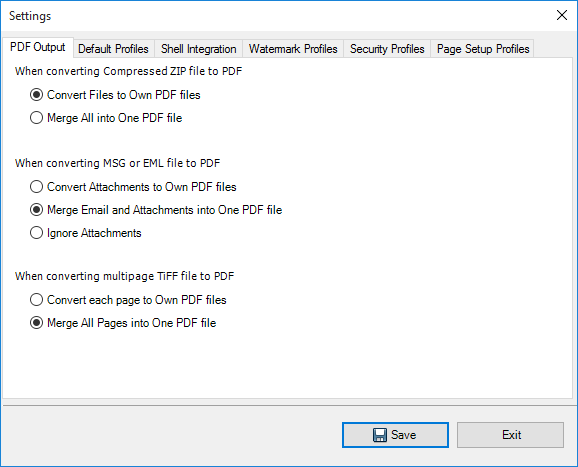
Click ‘Settings’ button to tweak and customize the PDF output behavior, choose single or multiple PDF merge options, modify the page setup, paper size, layout, watermark, password, security options etc.

For more references and help, refer to the PDF Help Manual, which can be invoke from Start Menu > All Apps > PDF Converter for Windows > Help Topics.
You can also download the full PDF help manual directly from this link:
